Cooking the books – tricks we used to get 2/3rds off a new eco kitchen
One thing we like almost as much as trying to be eco is saving money! When we moved into LittleEcoFlat it was clear we were going to have to redo the kitchen. Here’s the story on how we did that for under £5k instead of the going rate (£12k-£15k) – perhaps there are some tips here that might help you out too?
Where we started
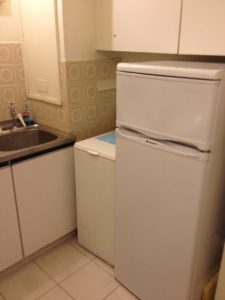
The kitchen was still in its original configuration from when the flats were built in the 1970s. The appliances were dated: the cooker was an electric coil of the old type that you have to switch on 10 mins ahead to warm up the ring. The fridge was working but very old and a low-efficiency rating. The washing machine was a top loader with a huge drum, meaning a lot of water got wasted for a normal-ish wash, and again old and low efficiency.
The space was set up with cabinets on all 3 sides, making a narrow space for one person to stand in and cook. We like to share our cooking and talk whilst we’re preparing food together so we wanted a more social layout. The space is small so achieving that plus enough storage and room for the appliances was quite a challenge.
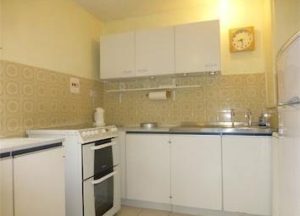
We also found there was a lighting problem; the kitchen window faces south-east and gets decent light well into the afternoon, however, it’s the only window in the flat which points directly towards the rest of the flats, so the previous resident had put up a roller blind for privacy. This combined with a dingy-ness from the crowded cabinets and some very 70s brown tiling meant you’d end up with the blind down in the daytime and the lights on!
Finally, we did an unconnected bit of investigating and noticed we had some very old electrics (we’re talking wound-wire fuses). An electrician confirmed that our service unit needed upgrading, and also told us that all the kitchen sockets and appliances were daisy-chained off one supply line and this needed correcting, so we knew we’d do that at the same time
The conventional route
We knew we wanted to ensure we had high-efficiency appliances but we had no particularly unusual requirements so we started off by getting quotes and prices in from the normal places you’d try: in particular we looked at Wickes, IKEA and John Lewis, and we spoke to friends about prices at Howdens, Wren and many others.
We established the price for an “all-in” fitted kitchen would be in the region of £11k-£13k if we chose fairly mid-to-low range options for everything. That includes units, appliances, fitting, plumbing, and really basic electrics, but we’d also need to cover the additional electrical work to route in another supply, and the tiling, which would be another £1k-£2k.
Now, £12k-£15k to redo a single room was already a pretty daunting number to us, but we were also finding ourselves very underwhelmed with what was on offer. We did the “full works” consultation with the in-store kitchen designer person, and what they were offering was a fitted kitchen, supposedly the height of desirability. But the resulting 3D computer illustration was bland and uninspiring, and the layout was having items shoved into it based upon an assumption of a much larger kitchen meaning it did not provide features we wanted. We’d decided we’d really like to squeeze in a small dishwasher and some drawer units if we could, but this seemed to add expense to the fitted kitchen quote because our funny-shaped kitchen was not a good fit for this template approach.
We decided that there must be something better out there and that we should look at making up our own pick-and-mix solution from different sources.
Measuring up
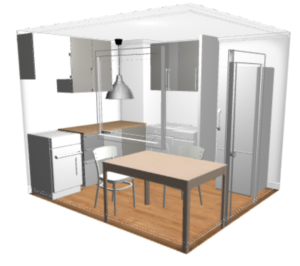
The starting point was to understand the space we had and how we broadly wanted to lay it out. We’d already ripped out the old kitchen in the process of other work so we had a blank slate (see previous post on: “Pining for a warm floor”). We measured the shape of the walls, including an odd column in the corner which carries a lot of our pipework. We used IKEA’s 3D Kitchen Planner to model the main areas of the kitchen; this is free to use and basic but good for playing with ideas. For a more complex area of the kitchen shelving, we made a 3D model on Solidworks, because we have this available, but you can also do it for free on Google Sketchup or Autodesk Fusion.
Having this model was particularly useful to us because our 70s-built flat has a kitchen based around imperial-size base cabinets, meaning the switch to metric left funny slivers of space unfilled and needed some mucking around to use space efficiently. Having it all on the computer made this tinkering much easier than trying to do it with a tape measure in the room itself.
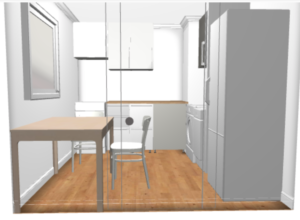
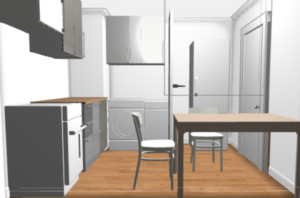
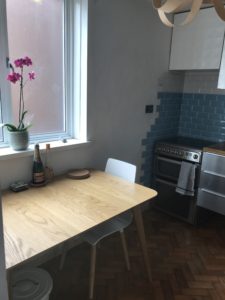
We worked out the rough layout we wanted was a main run along the back wall, consisting of oven/hob, worktop, and sink, and a second area at the side alcove. This would make a good space for food preparation, with the washing machine and dishwasher underneath. We would fit wall cabinets for space, but to avoid making the room feel small they’d be tall and shallow. We’d leave the area above the sink open all up to the ceiling, avoiding the feeling that the person washing up is crammed in, and meaning we could use the second lighting point without modification.
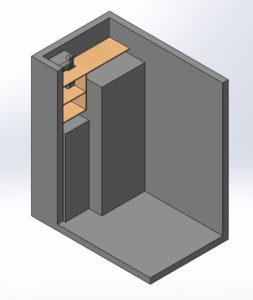
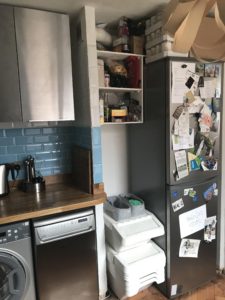
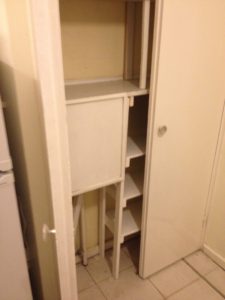
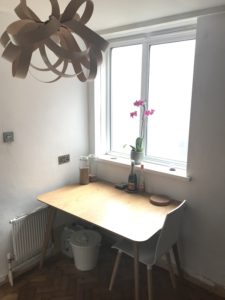
We decided to rip out some cupboard doors and shelves near the door – this was screening off some big ducting for the air extraction but it wasn’t providing effective storage space. We worked out we could put the fridge there and build some new, open shelving for storing dry foods, as long as it had gaps cut out to fit around the pipes well. Next to the fridge would be our recycling area. The rest of the room now opened up for a small table and two chairs under the window.
Getting to this layout evolved through different stages, and we spent a lot of time thinking about how we use kitchens we’ve had in the past. For us we realised our kitchen is ideally a very social space because we like to spend time chatting and cooking together, so having a “cook” area next to a slightly separated “prep” area was appealing; often when we’re making food together one person is stationary chopping veg and the other is moving around between hob/cupboards/sink. This worked well allowing us to be out of each other’s way but still able to chat easily. We definitely recommend thinking about what day to day living in the space will be like for you and using that to guide the layout.
Greater than the sum of its parts
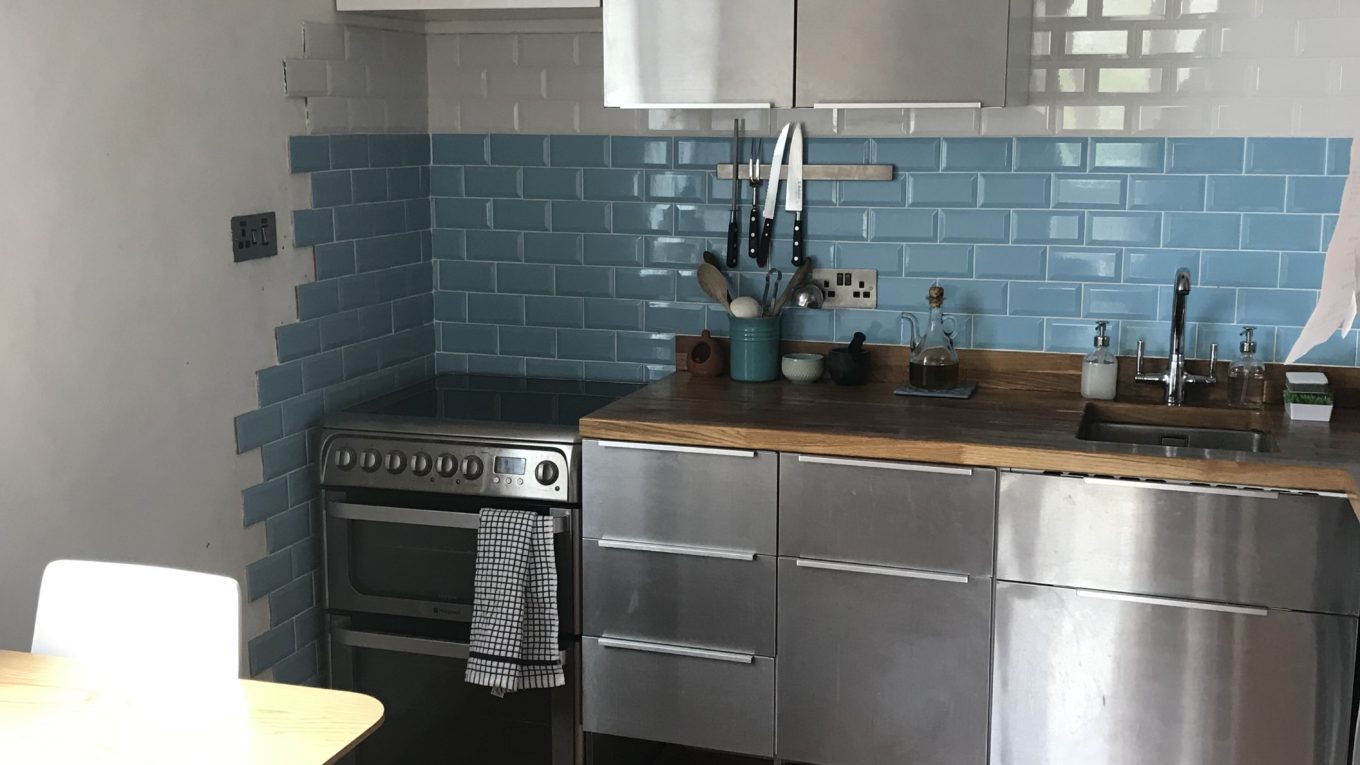
The first savings we unlocked was by moving away from a fitted kitchen toward a pick-and-mix approach. This meant having some units, but a standalone oven/hob and standalone appliances. We were actually keen to trade off the clean, hidden-away aesthetic of fitted appliances, which we found a bit clinical, in return for a bolder aesthetic. We decided we liked the stainless steel look and would pick a similar finish across the units and appliances. By having them bought separately, but keeping a similar visual component, it meant we could get the best price on each item yet the finished kitchen still looks like a cohesive space.
Base Units, Wall Cabinets & Doors
We looked at cheap sources and the best options we found were Units Direct and IKEA. If anything Units Direct are the cheapest, but IKEA is a good option on both costs and on their wood sourcing. They make sure none of their wood comes from Intact Natural Forests (INF) or High Conservation Value Forests (HCVF) unless it’s certified as responsibly managed.
IKEA had the Grevsta stainless steel doors we liked and made lots of different sizes/configurations which allowed us to fit metric cabinets into an Imperial-measure space. It’s also easy to get spares and repairs in the future.
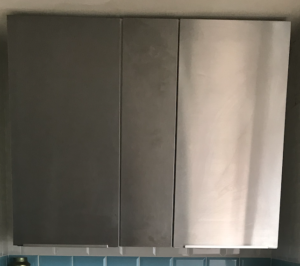

We went away from down-to-floor cabinets with kickboards and extra face panels to seal off every corner. Partly this is a legacy of our frustration with kitchens in rented houses and trying to clean them when cheap partly damaged panels are stopping you brushing up properly. Partly it’s because the flat is done in a mid-century modern style (e.g. the parquet floor we put it on a previous blog post) and we thought having stainless cabinets on stainless legs would fit in really nicely.
When the base units and cabinets came we put them together and installed them ourselves. We love doing a bit of flat-pack assembly of a weekend, and these ones were quite straightforward.
We drew up some laser-cut custom shelving for the niche – a project linked to our Shelfie using lasers blog post – to fit around a fridge. This was in birch ply and came to about £150 we think, but it’s a bit tricky to separate out costs since it was done in with the alcove pieces. At the same time, we got a piece of mirror acrylic laser cut to replace the old wooden ducting cover – see picture above. This was a cheap way to get a mirror into the darkest corner of the room and brighten it up.
The overall cost difference is truly staggering – the IKEA shop for all the “furniture” – base units, legs, drawers, wall cabinets, doors, fittings and handles – came to £779. Even including those shelving costs of £150, that’s a total of £930, a saving of 71% compared to the £3253 we were quoted for the fitted kitchen option.
Appliances
We set ourselves a criterion that every appliance had to perform to an excellent standard on energy ratings. We also prioritised energy use for which appliances we chose, to avoid installing an energy-guzzling kitchen. Oven, fridge-freezer, and washing machine we viewed as essential, dishwasher we thought of as a luxury until we found out they can use less water and energy than hand washing, in either case, we both hate doing the dishes so we definitely wanted it. A tumble dryer was definitely out of the question as these are a big energy drain. Instead, we put up hooks in the living room to put up a washing line on laundry day (LittleEcoFlat doesn’t have any outside space).
Then, we needed each appliance to fit the space available. This narrowed down the field instantly, because we had a tight space. For the dishwasher, we needed a slimline version to make it fit in, and there were not many options. For the fridge/freezer, finding a single not-huge fridge was surprisingly difficult as the market appears to have seized upon double door American-style fridges with internet connected ice makers etc., meaning even many of the single units were much wider than the old fridge/freezer had been. For the oven, we wanted induction hob, although we were not very interested in any other tech gadgets (pyrolytic cleaning, slide-in doors). Induction hobs are great to cook with as they are as responsive as gas and highly efficient. Finally, we wanted all the appliances in a stainless steel grey finish.
In order to keep costs down, we checked our employee benefit/discount schemes. Usually, these are little-known and a bit gimmicky but they can make a big impact on big purchases like this and both of us found we had some discounts. LittleEcoT’s educator discounts beat mine; he gets 45% off Hotpoint/Indesit/Whirlpool group appliances. This literally saved us several £100s so if you’re in employment, particularly if it’s something like academia, we’d really recommend asking colleagues or HR if you’re eligible for anything like this. Through this discount, we got an A rated oven, A+++ rated washing machine, and A+ rated dishwasher.
We couldn’t find a fridge-freezer from that source that was the right size to fit in the alcove and instead got an A+ rated Hoover one.
Overall our high-efficiency appliances cost £1312, a saving of 45% compared to the £2399 we were quoted for entry-level options with the fitted kitchen.
New for Old
We were concerned to make sure the old appliances were disposed of properly. Happily, manufacturers of new appliances will take your old ones away for a minimal fee and sort them out properly. We did this for the oven, washing machine, and fridge, meaning those old ones are now either recycled in a WEEE compliant fashion, or in some cases these schemes give old working appliances to low-income families.
Worktops
Choosing which way to go with worktops took a while. We were cautious of marble-effect resin laminated chipboard which can crack, swell or peel if it’s not fully sealed. But stone or materials like Corian were above our price range. On the original fitted kitchen quote, we ended up going for a higher-spec resin option where the coating is quite thick so it lasts well.
With the fitted kitchen options a marble or stone look seemed to go with it, but once we were looking at our stainless steel idea it seemed much better to go for wood, we liked the warmth and colour it would bring. Solid wood worktops are a great deal cheaper and they’re nice and strong, but they do then need some care and thought. A wood worktop needs trivets/heat pads under hot pans, and can’t have water left sitting on it else it’ll blacken. It needs re-oiling every few months. Personally, we’re happy with the trade-off.
Two sources we checked for worktops were IKEA and Worktop Express. IKEA came out quite cheap, but a colleague had just got their worktops done with Worktop Express and they were even better, offering thick FSC European oak custom worktops at a really good price.
Part of the cost for worktops is “templating”; walls are rarely as straight and flat as they appear, and measuring up for a piece of stone or resin to fit exactly is a tricky job. It’s normally done after base units are in. In this case, I measured up for our worktop before base units went in and didn’t use a templating service. This meant taking a lot of measurements very carefully, working out exactly how the walls taper. I also took advantage of the wood upstand being quite thick to conceal a deliberate gap between worktop and wall on all sides, partly for expansion and partly to allow for any measurement inaccuracies. I then drew up exactly what we needed as engineering drawings and sent it to Worktop Express, who were very obliging about working to those rather than their online quote system. Since doing this used some professional experience, I wouldn’t advise doing your own template lightly, but for us it made sense and there was a pleasing moment when the finished worktop slid into place in the alcove just as planned.
Fitting the individual sides of the worktop was pretty easy, the oak is a bit hard to get screws into but one side was straight on to base units, the other on to battens on 3 sides, all fairly standard. The tricky bit was getting the chamfered point where they met fixed down well. Getting heights consistent was a mission and required some shimming on the base unit side but we got there. Similarly, the upstand was fairly straightforward, sawing the hard oak was tough but once the pieces were right we just glued it in place.
Worktop Express were friendly, good value and their machining was excellent quality. Unfortunately, some gremlins within their system attacked our order, leading to some big problems with phantom deliveries. Eventually, our worktops came on the 4th attempt, having caused quite some frustration. But aside from that glitch, we would recommend them.
A fun bonus was you’re allowed to keep all your offcuts from a custom job, so the sink cutout piece got a light sanding down and is now a lovely chunky chopping board. Other offcuts are waiting for upcycling; we have a project in mind to make some pot stands with one, and the remaining large offcut will be used in a future project.
We bought a sink at the same time, an underglued one, and mounted it underneath. In hindsight this was a step too far, we did it as one should with bar clamps and the right glue but it was difficult to set up exactly right without any splodges in a home environment, and even worse – it fell off after a couple of weeks the first time! Thankfully there was no plumbing damage. We reglued it and then did a second edge seal, and added some fixing battens to clamp the edges up to the worktop and avoid any peeling. It’s been sturdy ever since, but it wasn’t the best of jobs and we’d have been much more sensible to get it done by the worktop manufacturers.
Overall our worktops and sink cost us £656 with no templating charge, a truly huge saving of 76% compared to £1931 of worktop and sink and £757 of templating and installation we were quoted for the fitted kitchen option.
Services
We feel services costs really sit outside the comparison here, because they needed doing, and doing properly, whatever we’d chosen.
We had the potential to use the gas supply to the flat, but we didn’t want to because we think an electric oven is more compatible with a renewable-supplied grid in the future. We had some plumbing costs of getting the appliances and new sink linked up, these came to ~£350.
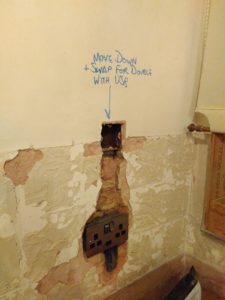
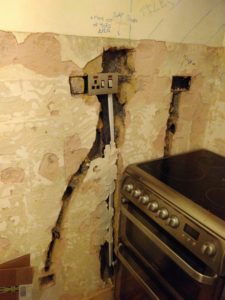
The main work on the kitchen was running the new earth to allow more sockets to be wired up. This is difficult to show as a separate cost because it was tied into getting the service unit upgraded, but our electrical work costs came to £1240. We went with a very professional firm, a big outfit run well by a guy who came and looked around the flat properly and agreed to the work in detail with us in advance. This work went very fast with a team of 3 people blasting around and doing it within 1 day, and something that helped is we went round with a marker pen and drew instructions of the tasks to be done directly on to the walls, meaning that they could let themselves in whilst we were at work and get cracking with it. Everything went in as agreed, however, there was one major accident – one socket box being put in on the wall between kitchen and bathroom went into brickwork that was really quite narrow, which no-one had realised, and so the back side of it blew outward into a big hole in the bathroom wall. That was a bit of a surprise for all of us! Professionalism shone through in that they quickly explained to us that they would clean out and plaster up the bathroom, and indeed when they left they’d made sure the only inconvenience left was a repaint of that wall which we weren’t too worried about. Accidents can always happen even to careful people but at least when you’re working with someone reputable you can trust them to make it right.
Labour
This is a key area in which we saved huge amounts, by essentially providing the labour for free ourselves. Days upon days of time were poured into the kitchen by both of us, we even got my little brother to pitch in once during a Sunday afternoon visit! Some of the biggest tasks were:
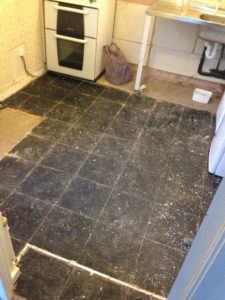
- Stripping out old units
- Removing old tiles
- Sanding back tile adhesive blobs
- Boarding up & plastering a big hole in the wall behind one of the cabinets (why was it even there? We’re not sure)
- Grit plastering over all the channelling for electrics
- Building the cabinets and base units
- Installing the base units in place
- Glueing the sink
- Installing the worktop
- Hanging the cabinets
- Assembling the laser-cut shelving
- Tiling
- Grouting
- Painting
Overall this represented many, many weekends of work, it was a huge undertaking. Keeping the radio loud and spirits up worked wonders. A bag of grit plaster was an absolute essential and helped us patch at so many points. It’s quite easy to mix and use, although messy to clean up.
How much was this worth? Well, a direct comparison isn’t possible but for context, the quote we got gave labour costs for just assembling and installing the fitted kitchen (i.e. about 5 of the above 14 tasks plus a small part of the plumbing and electric cost) as £2551. The costs of not doing anything ourselves would probably have been so high we wouldn’t have been able to afford to do the kitchen at all.

Decorating & Furniture
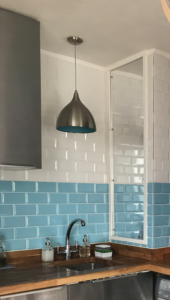
We bought metro tiles in a duck-egg blue and white colour (see links at the bottom for details) which was cheap and simple. With 10% waste allowance, adhesive, and grout, the lot came to £254. We’d never done any tiling before so there were some tools we needed to buy, most notably the tile cutter but even that was about £30. We didn’t realise that tiling is significantly easier with larger tiles i.e. fewer to fit, easier cuts to make. So we actually had picked something fairly challenging, however, it turned out to be a really good choice for our walls – they’re lumpy in some places, but now with the bevelled edges of the tiles breaking the surface up, you’d never be able to tell. Grouting was a nuisance, as was cutting tiny slivers of tile for tiny spaces, but we were really pleased with the end result. It’s difficult to tell what it would have cost to have had somebody tile for us, we’ve put it in as £1000 as we think they would have charged a lot on labour and probably not sourced the materials as cheaply.
We dealt with the problem of the overlooked window by putting some frosting film on it, giving the space the privacy it needs without cutting out light. That rose the light level in the room a great deal and cost us about £15 for the film.
With the room being small, the rest of the decoration was mostly avoiding overcrowding the space. The rest of the room is painted white to keep it bright and to keep the focus on the wood and steel. We keep out bits of cookware that are either pale blue, or a contrasting orange, to work with the tiles. We got ourselves a lovely mid-century modern style dining table which extends out, so that it can be brought into the living room and pulled out to seat up to 6, yet in our little kitchen, it can sit under the window and be a good breakfast/weekday dinner table. That was an end-of-season showroom model so we got it for £150. That’s about it, other than our table and chairs the floor is deliberately left clear to allow movement in the room without it being cramped.
The Verdict – Did we do it? Was it worth it?
We saved a huge £8709 by doing our kitchen in our own way, bringing the whole project in just shy of £5000 – actually we assumed at the time we’d slightly overshot £5k due to the high cost of the electrical work, so getting a chance to tot it all up for this post has been a pleasant surprise!
Here’s the summary of costs for both options:
|
Item |
Fitted cost |
Our cost |
Saving |
|
Base units, cabinets, shelving |
£3,253 |
£930 |
71% |
|
Appliances |
£2,399 |
£1,312 |
45% |
|
Worktop templating |
£757 |
£0 |
100% |
|
Worktop |
£1,931 |
£656 |
66% |
|
Installation |
£2,551 |
£0 |
100% |
|
Tiling |
£1,000 |
£284 |
72% |
|
Common costs – Services, dining table |
£1,755 |
– |
|
|
Grand Total |
£13,646 |
£4,937 |
64% |
Was it worth it? Definitely. It was a lot of extra cognitive work to plan the space ourselves, and a lot of extra physical work with all the labour required. It also took a lot of calendar time, although if we’re honest that’s just how we work. We don’t really mind living in part-finished spaces and preferred to pace the work gently and enjoy doing it together. We wish we were faster, but we just aren’t, and we were learning as this is our first time!
Ultimately the kitchen we’ve ended up with is worth more to us than the £13k option. Instead of something impersonal, we’ve had the freedom to consider what we need and want from the space and design it around ourselves and our tastes. When it was finally done and we got settled into it, we were delighted with how well it fits in with us both being in there cooking together, how pleasant it is to eat by that window, and how spaces are fulfilling the plans we had for them. Now our kitchen is a bright, airy space where we can turn the leeks from our allotment into hearty soups!
Links
- Worktops
- We used “Worktop Express” and know several others who have too. We’re really happy with the worktop and the price we paid (~£650).
- The sink was a WEX Atlas Sink (£120) and the tap was bought in John Lewis clearance (~£45, 50% off)
- Units
- We got ours from the IKEA METOD range
- Units direct – although we didn’t in the end, many people we know used this site for their DIY kitchens
- Appliances
- A key thing to check: can you get any discounts (e.g. through work)?
- e.g. in academia, there is a scheme called “Rewards extra” with discounts at Wickes etc
- Through these routes, you can get appliances directly from suppliers (e.g. Hotpoint/Indesit)
- We choose these Appliances based on space, energy etc…:
- Fridge/Freezer: Hoover HFF195XK 50/50 Frost Free Fridge Freezer – Stainless Steel – A+
- Dishwasher: Bosch SPS53M08GB Freestanding Slimline Dishwasher, Silver – A+
- Inductive hob/grill/cooker: Hotpoint Ultima HUI611 – Stainless Steel – A
- Washing Machine: Hotpoint RPD9467JGG – Silver – A+++
- A key thing to check: can you get any discounts (e.g. through work)?
- Trades
- We found our skilled help (plumbing and electrics) trades via check-a-trade
- Tiles
- Extra furniture etc.
- Lighting
- Main light above table was a steam bend oak pendent from Tom Raffield from John Lewis (sale >66% off, but still a splurge!)
- Cafe Pendant above sink bought (~£40, 50% off) from Lighting Direct
- Matching flat plate wall sockets from speedyelectrical (e.g. double with USB, ~£20)
- Storage
- Built-in wood storage from CutLaserCut (blog post linked to this: “A #shelfie using lasers”)
- SORTERA recycling boxes from IKEA (£6)
- Table and chairs (in John Lewis sale and heavily discounted)
- Chairs are Anton Dining Chairs from John Lewis (older design)
- The table was an Anton 6-8 Extending Dining Table in Oak from John Lewis
- Lighting
- Window film (Purlfrost) in the kitchen for letting more light in and privacy
- worked out ~£15 a window